Documentation
Execution Model
The Runaway execution model
Runaway was initially meant to execute code on academic computer clusters, but as we will soon see, simpler setup can be targeted just as well. Still, to understand why we implemented the execution model this way, it is important to have a rough idea of how computer cluster work. Usually those clusters are nothing more than a set of computers (called nodes), connected via the same (super-super fast) network, and which share the same file-system.
The user needs can range from executing a single large execution on multiple connected nodes, to performing a large set of small experiments using each, a fraction of a node. Leaving the management of the nodes to the users good will would instantaneously lead to chaos. For this reason, the usage of the platform needs to be managed by a so called scheduler (nothing to deal with the sched sub-command of Runaway which we don’t treat here). This program (Slurm, Torque, Pbs …) is responsible for giving time-bounded access to nodes with the goal of keeping every nodes busy, and every user happy!
The actual form of a computer cluster is the following:
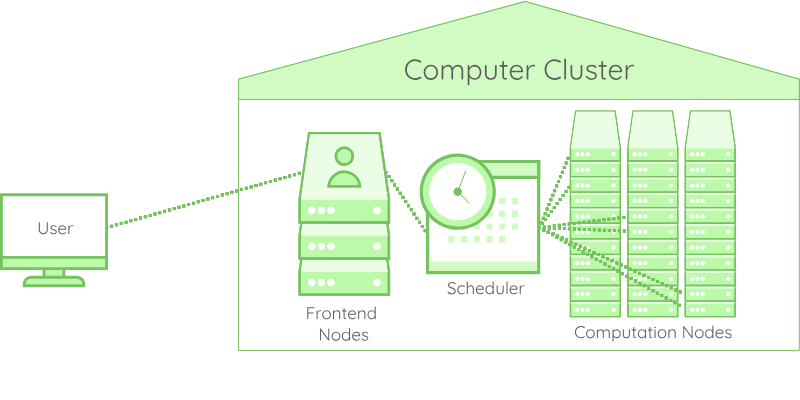
The users connect to the cluster through frontend nodes, which are not meant for calculation but for preparation work, and access to the scheduler. Using the scheduler cli, the user asks for an allocation, i.e. a set of resources for a given amount of time. Once the allocation gets granted, the node becomes accessible to the user, under different conditions depending on the platform policy.
With this model of computer clusters in mind, we developed Runaway to be able to adapt to this configuration with ease. From a bird’s-eye view, Runaway is composed of two main components:
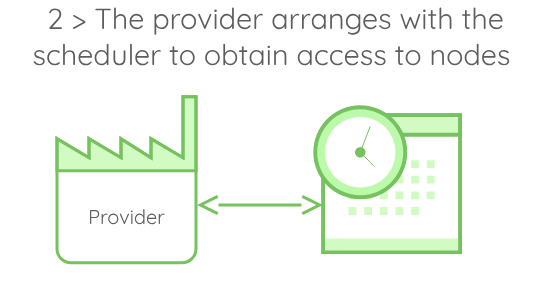
- A provider responsible for always keeping node handles available.
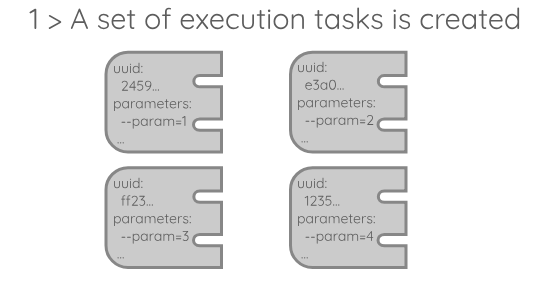
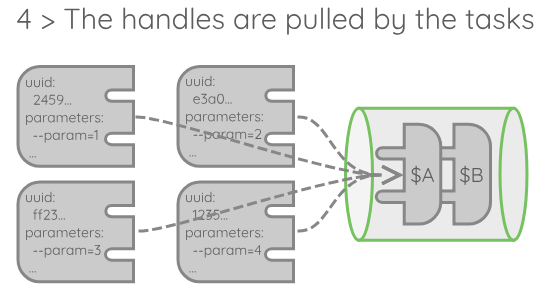
- A set of execution tasks, each responsible for advancing a single execution by the mean of a node handle. Those components are asynchronous, meaning that they can proceed with their work in parallel. You can think of them as small programs running on their own if you are not familiar with asynchronous programming.
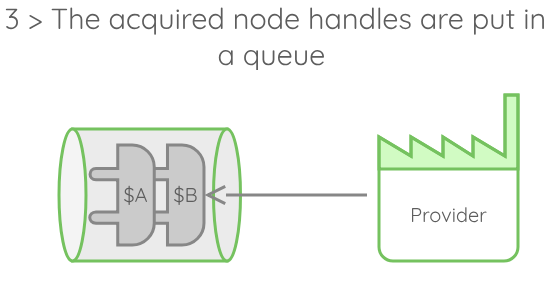
A usual execution of runaway would go through the following steps:


A few details about this execution model:
- When the provider arranges with the scheduler, it actually starts an allocation on the cluster. When granted, this allocation will provide access to nodes. In our case, we need the nodes to be accessible via ssh.
- The number of handles that is obtained by the provider is different from the number of nodes acquired. Indeed, the provider may (and should!) generate multiple handles for each nodes, each carrying a different execution context.
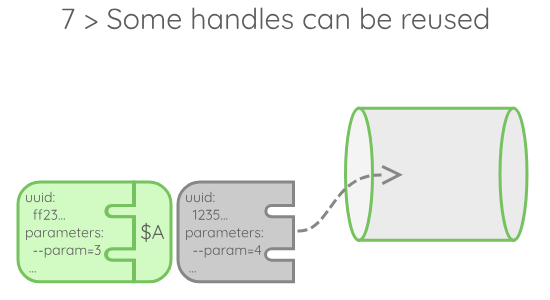
- When those handles are generated, they are tagged with an expiration date, which is set according to the allocation duration asked to the scheduler. When an execution is done with a handle, it is checked against this expiration tag. If the handle has expired, it is dropped, if not, it returns to the queue.
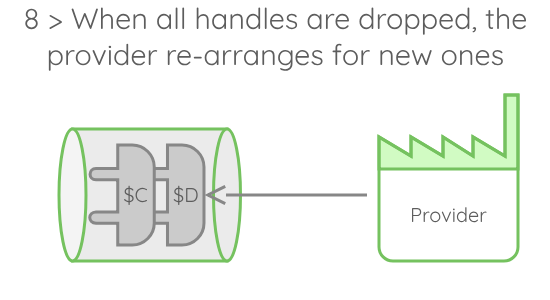
- The provider keeps track of the handles. When all handles disappeared, it gets notified and cancels the current allocation. Then, a new allocation is started, and this little game keeps going until all the executions were processed.
That is enough for a raw understanding of the execution model. Now, if you want to write your own profile for a platform not yet accessible, go on with the next section.
Steps to profile writing
A profile is contained in a .yml file installed in your a ~/.config/runaway folder. Moreover, all communications occurring with the remotes uses the ssh protocol. Runaway uses its own ssh config file located in ~/.config/runaway/config and stores every host fingerprint in ~/.config/runaway/known_hosts. Make sure that you have a raw understanding of openssh, and particularly proxycommands, before proceeding.
Here is a stub profile:
---
name:

ssh_configuration:

node_proxycommand:

allocation_duration:

directory:

start_allocation:
        -
        -

cancel_allocation:
        -
        -

get_node_handles:
        -
        -

execution:
        -
        -
The first part of this yaml file is composed of fields:
namessh_configurationnode_proxycommandallocation_durationdirectory
These are filled with a single string.
The second part of the file is composed of procedures:
start_allocationcancel_allocationget_node_handlesexecution
These are filled with lists of bash commands that will be executed in a remote pseudo-terminal at some point in the program.
Profile fields:
name
This field contains the name of the profile. It is better if matched with the name of the actual .yml file.
Example: If your file is called
my_profile.ymlyou can have the following section:name: my_profile
ssh_configuration
This field contains the name of the entry in the ~/.config/runaway/config file, that will be used by Runaway to communicate with the frontend nodes.
Example: Assuming your config file contains:
...

Host MyPlatform
    Port 22
    HostName my.platform.com
    User my_platform_user

...
Then you can have the following section:
ssh_configuration:
    MyPlatform
node_proxycommand
When the nodes are allocated, the provider will open a connection with every nodes. To connect to these nodes, the provider will use a proxy-command which gives the flexibility to accomodate multiple use cases. In this proxy-command, you can use the variable $RUNAWAY_NODE_ID which will be replaced by the host-name of the node.
Example: In most cases, you will access the nodes via the frontend. A proxy-command like this should do the job:
node_proxycommand:
    "ssh -F $HOME/.config/runaway/config -A -l my_platform_user MyPlatform -W $RUNAWAY_NODE_ID:22"
allocation_duration
This field contains the number of minutes between a handle creation and its expiry. Please note that the handle will not cease to be usable after reaching expiration. It will still be used by the currently holding task. It is just when this holding task reaches its end, that it will be checked and found expired.
This parameter must be tuned in regard of the maximal duration of your allocation, and the actual duration of your executions. If your allocation duration is 1 hour and one execution of yours takes 25 minutes, you can set the allocation_duration to 30 minutes, to ensure that two consecutive tasks will use the same handle.
If this setting is unclear to you, you can just set it to 1 minute, so that each handle gets used once.
Example: If you don’t want to tune this parameter, you can start with:
allocation_duration:
   1
directory
This field contains the path to the remote folder in which to store the archive sent from localhost (containing the code). This directory is also accessible using the RUNAWAY_REMOTE_PATH environment variable anywhere usable.
Example: You could put your data in your home:
directory:
   /home/my_platform_user/executions
Profile procedures
Before specifying the role of every procedures, let us take a moment to describe how they get executed. A procedure is written as a sequence of shell commands, all executed in the same pseudo-terminal using the sh interpreter. This allows you to cd into directories, to set environment variables for later use, and so on. The commands keep being executed while none fails, but if one exits with a non-zero code, the whole procedure gets aborted. Except for a few details, you can basically write those procedure as you would write shell code in your own terminal.
Note: In order to provide a dynamic forwarding of standard output and standard error, without involving a tedious installation, those commands are executed via a lightweight agent injected just before the procedure starts. To provide support for most unix platforms, this agent is itself written in the
shelllanguage.This has an implication on the subset of the language features you can use to write procedures. To our knowledge the major limitation is that since
shdoes not provide support for arbitrary strings, there is no way to handle single quoted strings properly. Otherwise all features should be supported.Finally note that the shell commands are written in a
yamlfile which is parsed before the commands themselves. For this reason, the commands have to be written as yaml strings, in which special characters are to be escaped.
An important feature of procedures, is that they gets executed in a context (current working directory and environment variables) managed by Runaway:
- The context is set before the procedure begins
- The context is captured at the end of the procedure (the non
RUNAWAY_-prefixed variables gets filtered though) - The context is inherited between different procedures
This allows to communicate information between procedures, such as allocation id, host names, etc.. Now let’s walk through the different procedures you need to write.
start_allocation
This procedure is executed by the provider on the cluster frontend, and must arrange with the scheduler (or lack thereof) to acquire access to the scheduler. The context in which this procedure gets executed is extracted from your local environment: All the RUNAWAY_ prefixed environment variables that gets captured by the runaway program are propagated to this procedure. This is a powerful feature as it allows you to write parametric profiles, which allocates a different types or number of nodes depending on the runaway context. Moreover, this context is augmented by a few other variables:
| Variable | Value |
|---|---|
| “RUNAWAY_PATH” | Path to the folder described in the directory field |
| “RUNAWAY_REMOTE” | Name of the ssh configuration used to connect to the cluster |
| “RUNAWAY_LEAVE” | String containing one of nothing, code, everything |
| “RUNAWAY_SCRIPT_PATH” | Path to the local script. |
| “RUNAWAY_LOCAL_FOLDER” | Path to the local folder in which runaway gets executed. |
| “RUNAWAY_SEND_HASH” | Computed hash of the sent archive. |
To communicate the acquired nodes to the provider, the procedure must export the RUNAWAY_NODES variable to a string containing a whitespace-separated list of host-names.
Example: If you target a single computer you can just have the following:
start_allocation:
    - "export RUNAWAY_NODES=\"localhost\""
If you target a platform managed by slurm, which allows interactive node connection you can have something in this flavour:
start_allocation:
    # We allocate and store the allocation id string
    - "alloc=$(salloc -N4 --no-shell 2>&1 | grep Granted)"
    # We export the allocation id for further use
    - "export RUNAWAY_ALLOC_ID=$(echo \"$alloc\" | sed -e \"s/salloc: Granted job allocation //\")"
    # We list the nodes of our allocation
    - "nodes_list=$(squeue -j $RUNAWAY_ALLOC_ID -o \"%N\" | sed \"1d\")"
    # We expand the different pieces of the nodes list and separate with whitespaces.
    - "while read line; do
           line_nodes=$(scontrol show hostnames \"$line\" | tr \"\n\" \" \")
           nodes=\"$nodes $line_nodes\";
       done <<< \"$nodes_list\""
    # We export the nodes
    - "export RUNAWAY_NODES=$nodes"
If you target a platform that does not allow interactive connection, you can add:
start_allocation:
    # We test for the existence of a host key and create if there is none
    - "test -f ~/.ssh/ssh_host_rsa_key || ssh-keygen -f ~/.ssh/ssh_host_rsa_key -t rsa -N \"\" "
    # We test for the existence of an sshd config and create it there is none
    - "test -f ~/.ssh/sshd_config || echo \"
         Port 2222\n
         MaxSessions 100\n
         HostKey ~/.ssh/ssh_host_rsa_key\" > ~/.ssh/sshd_config"
    # Then allocate and do your things
    ...
    # Then start an ssh daemon on every node. For slurm this is:
    - "(setsid srun --jobid=$RUNAWAY_ALLOC_ID /usr/sbin/sshd -f ~/.ssh/sshd_config -D &)"
If you want to have a parametric profile with default value, do something like:
start_allocation:
    # We set `n_nodes` to `RUNAWAY_N_NODES` if it exists and 1 if not.
    - "n_nodes=${RUNAWAY_N_NODES:=1}"
get_node_handles
This procedure is executed by the provider on every nodes returned by the start_allocation procedure. It is responsible for returning the handles which will be used to perform the executions. Handles are nothing more than a regular ssh connection, but which carry a specific context available under the RUNAWAY_HANDLE_ID. This allows to generate a variable number of handles depending on the node, and for each handle, to reduce the usable resources to chosen ones. Its context is inherited from the start_allocation procedure. As such, any variable set during this one is available to the cancel_allocation procedure, among which, the variables extracted from the runaway environment. Moreover, the following variables are set by Runaway:
| Variable | Value |
|---|---|
| “RUNAWAY_NODE_ID” | One of the node id exported in RUNAWAY_NODES during start_allocation |
This procedure must export the RUNAWAY_HANDLES to a list of whitespace-separated handles id.
Example: If you target a single computer and want 4 executions to run in parallel:
get_node_handles:
    - "export RUNAWAY_HANDLES=\"1 2 3 4\""
If you target nodes with fixed number of threads and want to generate one handle per thread
get_node_handles:
     - "cores_avail=$(taskset -pc $$
       | sed -E \"s/(.*): (.*)/\\2/g\"
       | tr \",\" \"\n\"
       | sed -E \"s/^[0-9]*$/&-&/g\"
       | sed -E \"s/-/ /g\"
       | xargs -l seq
       | tr \"\n\" \" \")"
     - "export RUNAWAY_HANDLES=$cores_avail"
execution
This procedure is executed by the execution tasks on their acquired node handle. The context is inherited by the get_node_handles procedure that gave rise to the handle concerned. Moreover, the following variables are set by Runaway:
| Variable | Value |
|---|---|
| “RUNAWAY_HANDLE_ID” | One of the handle id exported in RUNAWAY_HANDLES during get_node_handles |
| “RUNAWAY_ARGUMENTS” | The arguments to be given to the script for this execution |
| “RUNAWAY_UUID” | The unique identifier of the execution. |
| “RUNAWAY_PWD” | The path to the remote folder in which the data were decompressed |
| “RUNAWAY_SCRIPT_PATH” | The path to the script to be executed. |
Example: If you just want to execute the code
execution:
    - "cd $RUNAWAY_PWD"
    - "./$RUNAWAY_SCRIPT_PATH $RUNAWAY_ARGUMENTS"
If you want to reduce the accessible threads to the one stored in the handle id:
execution:
     - "taskset -p -c $RUNAWAY_HANDLE_ID $$"
     ...
cancel_allocation
This procedure is executed by the provider on the frontend and is responsible for arranging with the scheduler to cancel the current allocation. Its context is inherited from the last executed start_allocation procedure. As such, any variable set during this one is available to the cancel_allocation procedure, among which, the variables extracted from the runaway environment.
Example: If you do not have any scheduler, just do:
cancel_allocation:
    - "echo ok"
If you target a platform managed by slurm, assuming you exported the allocation under
RUNAWAY_ALLOC_ID:cancel_allocation: - "scancel $RUNAWAY_ALLOC_ID"