Documentation
Tutorial
Setting up an experiment
To ease things out, we will be working on a simple experimental code from facebook ai research, mixup: Beyond Empirical Risk Minimization. We made our own fork with a few tweaks to the code, but we could be using the original repository without any troubles. Let’s begin by cloning it:
$> git clone https://gitlab.inria.fr/runaway/mixup.git
  Cloning into 'mixup'...
  remote: Enumerating objects: 67, done.
  remote: Counting objects: 100% (67/67), done.
  remote: Compressing objects: 100% (67/67), done.
  remote: Total 67 (delta 33), reused 0 (delta 0)
  Unpacking objects: 100% (67/67), done.
$> cd mixup
$> chmod +x train.py
$> ls
  LICENSE  LICENSE-pytorch-cifar  models  README.md  train.py  utils.py  scheduler.py  experiments.xlsx
The experiment is pretty simple:
- The logic is contained in the
train.pyscript - It loads input data from the
./datafolder (data are downloaded at first execution) - It performs the experiment according to arguments passed to the script
- It stores output data in the
./resultsand./checkpointsfolders
First, run it once on your local machine just to have the data downloaded by the script:
$> ./train.py --dry-run --epoch=1
  ==> Preparing data..
  Downloading https://www.cs.toronto.edu/~kriz/cifar-10-python.tar.gz to ./data/cifar-10-python.tar.gz
    4%|█▏                                         | 6012928/170498071 [00:03<01:17, 2132882.97it/s]
  Extracting ./data/cifar-10-python.tar.gz to ./data
  Files already downloaded and verified
  ==> Building model..
  Epoch: 0
  [>..............]  Step: 4s415ms | Tot: 4s415ms | Loss: 2.458 | Reg: 0.00000 | Acc: 11.109% (28/256)
  Saving
  ...
You should see the data being downloaded and a first training iteration starting (the --dry-run option performs a single batch to make things faster).
When over, you should have two new folders (checkpoint and results), both filled with data generated during the experiment:
$> ls .
  checkpoint  data  LICENSE  LICENSE-pytorch-cifar  models  __pycache__  README.md  results  train.py  utils.py
$> ls checkpoint
  ckpt.t70_0
$> ls results
  log_ResNet_0_0.csv
For now, you can remove those results:
rm -rf checkpoint results
Executing code on remote resources with runaway exec
Fundamentally, Runaway is made to execute scripts on remote resources parameterized by a set of command line arguments. The simplest use case we can think of, is to perform a single execution of a script on a remote host. The runaway exec sub-command allows you to do just that. Assuming you have a localhost profile installed, you can proceed with the following command:
$> runaway exec localhost train.py -- --dry-run --epoch=1
runaway: Loading host
runaway: Reading arguments
runaway: Reading ignore files
runaway: Compress files
runaway: Acquiring node on the host
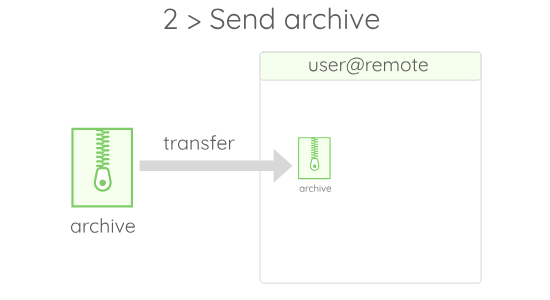
runaway: Transferring data
runaway: Extracting data in remote folder
runaway: Removing archive
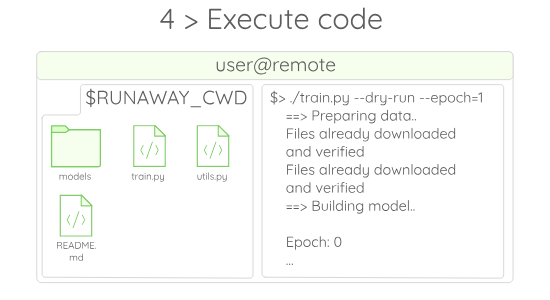
runaway: Executing script
==> Preparing data..
Files already downloaded and verified
Files already downloaded and verified
==> Building model..
Epoch: 0
[>..............] Step: 5s575ms | Loss: 2.302 | Acc: 10.000% (20/200) 2/100
Saving..
runaway: Compressing data to be fetched
runaway: Transferring data
runaway: Extracting archive
runaway: Cleaning data on remote
$>
Pretty straightforward!
The first thing to notice is that runaway copies the stdout and stderr of the remote command, but also emits a few messages on the stderr. Those messages are always prefixed with runaway:. You can turn off those messages by using the --silent option, which would give the same output as if the script was run on your local computer.
If you take a look at the runaway messages, you can get a glimpse of what happens in the background. A picture being worth a thousand words, here is a quick summary of the whole process:
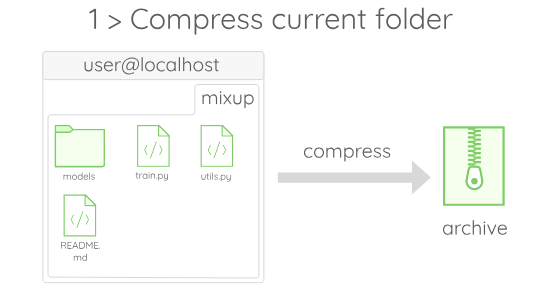
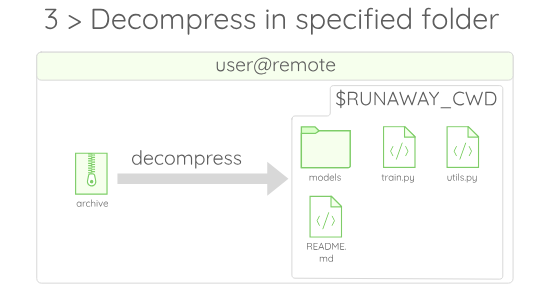

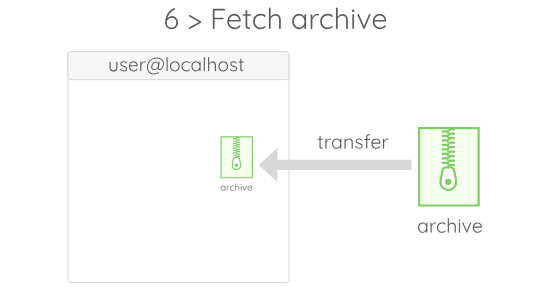

If you wonder what $RUNAWAY_CWD stands for, just assume that it is a value given by Runaway to the folder in which the code gets executed on the remote.
According to that, we can see that the result folders are (again) filled with output data:
$> ls checkpoint
  ckpt.t70_0
$> ls results
  log_ResNet_0_0.csv
Ok so that is nice, but running the code on the localhost profile is not very interesting. If you have installed any other profile, the exec subcommand is a good way to check if everything is setup properly. Try to run it on an other host:
runaway exec your_profile train.py -- --dry-run --epoch=1
You should see the same results that occurred earlier on localhost!
Executing batches of experiments, with batch
If you work in a scientific context, chances are, you will have to run several hundreds of executions of the same code. If you know beforehand which parameters you want to execute, you can use the batch sub-command to automate the parallel execution of those.
Let’s assume that you want to run a small campaign with every combinations of the following parameter:
| parameter | value |
|---|---|
--lr |
0.1, 0,01 |
--no-augment |
activated or not |
This can be done easily using a product string for arguments. Product strings allows you to generate all the elements of the Cartesian product of strings sets. In our example, we want to generate all the possible combinations of the sets $\{“\text{–lr=}”\}, \{“\text{0.1}”; “\text{0.01}”\}, \{“\text{ –no-augment}”; “”\}$ assembled in a single string. The product string that summarizes this is the following one:
{'--lr='} + {'0.1'; '0.01'} + {' --no-augment'; ''}
This way of specifying arguments is interesting when you want to quickly start something. If you prefer to use files to specify your parameters, the way to do so is explained in the advanced page.
To execute a batch of experiments using the parameters of the product string, simply run:
$> runaway batch localhost train.py -- " {'--dry-run --epoch=1 --lr='} + {'0.1'; '0.01'} + {' --no-augment'; ''}"
  runaway: Loading host
  runaway: Reading arguments
  runaway: Reading ignore files
  runaway: Compress files
  runaway: Transferring data
  runaway: Starting execution with arguments"--dry-run --epoch=1 --lr=0.1 --no-augment" in $RUNAWAY_PATH/$RUNAWAY_UUID
  runaway: Starting execution with arguments"--dry-run --epoch=1 --lr=0.1" in $RUNAWAY_PATH/$RUNAWAY_UUID
  runaway: Starting execution with arguments"--dry-run --epoch=1 --lr=0.01 --no-augment" in $RUNAWAY_PATH/$RUNAWAY_UUID
  runaway: Starting execution with arguments"--dry-run --epoch=1 --lr=0.01" in $RUNAWAY_PATH/$RUNAWAY_UUID

  10eb724a-e9b4-441b-bbe2-e197a11d628d: pid 48905's current affinity list: 0-7
  10eb724a-e9b4-441b-bbe2-e197a11d628d: pid 48905's new affinity list: 2
  da177f52-bb68-4799-8d82-6b511d557181: pid 48955's current affinity list: 0-7
  da177f52-bb68-4799-8d82-6b511d557181: pid 48955's new affinity list: 0
  cc34172f-e043-458d-a6e9-bdd7cd56a208: pid 48906's current affinity list: 0-7
  cc34172f-e043-458d-a6e9-bdd7cd56a208: pid 48906's new affinity list: 3
  44330066-9961-4443-9021-8aa505d36fea: pid 48957's current affinity list: 0-7
  44330066-9961-4443-9021-8aa505d36fea: pid 48957's new affinity list: 1

  ... Executions speaking ...

  runaway: Cleaning data on remote
Okay, if everything works as expected, you should have seen something close to this output. The first thing to notice is that we can see in the runaway: ... prefixed lines that the product string was interpreted correctly, and generated the expected arguments string. Next, we can see that Runaway forwards the outputs of the stdout and stderr of the executions, prefixed by an unique identifier, such as 44330066-9961-4443-9021-8aa505d36fea: .... If you have more than one cpu-cores, you should see that the executions outputs are interleaved, showing that they are actually executed in parallel.
Also, you can note that every execution affinity (the cpu cores it has access to) gets tuned to access a specific and independent thread. This is one of the main characteristic of Runaway: It allows to manage the hardware resources allocated to every execution in a simple manner. You can learn more on that in the execution model section of the documentation.
Now that the experiments were processed, the outputs of each execution should be visible in the batch subfolder:
$> ls -al batch
  total 24
  drwxr-xr-x 6 apere apere 4096 Jan 28 10:01 .
  drwxr-xr-x 9 apere apere 4096 Jan 28 10:00 ..
  drwxr-xr-x 8 apere apere 4096 Jan 28 10:01 10eb724a-e9b4-441b-bbe2-e197a11d628d
  drwxr-xr-x 8 apere apere 4096 Jan 28 10:01 44330066-9961-4443-9021-8aa505d36fea
  drwxr-xr-x 8 apere apere 4096 Jan 28 10:01 cc34172f-e043-458d-a6e9-bdd7cd56a208
  drwxr-xr-x 8 apere apere 4096 Jan 28 10:01 da177f52-bb68-4799-8d82-6b511d557181
In this folder, we find a sub-folder named after the uuid of every executions. In those sub-folders, we can find the data fetched from the execution:
$> ls batch/10eb724a-e9b4-441b-bbe2-e197a11d628d
  checkpoint  ecode  README.md  results  stderr  stdout  train.py  utils.py
A few things are to be noted about this folder. First, some files were not brought back from the remote. For instance the data folder containing the training data was not fetched. This is due to one of the transfer optimization we set up in the repository.
Note: It is likely that during an experimental campaign, you will have to make modifications to your code. Results that once existed, may become difficult to reproduce with your new code-base. For this reason, a good habit is to keep the code files in your fetched data (in our case, all the *.py files), so as to replay an experiment in case you fail to reproduce your results.
Another thing to notice is that the stdout, stderr and ecode are each stored in a separate file:
$> cat batch/10eb724a-e9b4-441b-bbe2-e197a11d628d/stdout
  pid 90505's current affinity list: 0-7
  pid 90505's new affinity list: 1
  ...

$> cat batch/10eb724a-e9b4-441b-bbe2-e197a11d628d/stderr
  ./train.py:188: UserWarning: volatile was removed and now has no effect. Use `with torch.no_grad():` instead.
  inputs, targets = Variable(inputs, volatile=True), Variable(targets)

$> cat batch/10eb724a-e9b4-441b-bbe2-e197a11d628d/ecode
0
This behavior can be customized through the use of the --post-command and --post-script options. Check on the advanced tricks to see how to trigger different post processing.
Automating further with the sched sub-command
Now, we know how to run a batch of executions on the Cartesian product of parameters. This is powerful, but it does not allow you to do some interesting things such as:
- Reschedule failed executions
- Update a list, webpage or a database with results
- Choose the parameters of the executions online to perform hyper-parameter optimization
Hopefully, Runaway provides a sched sub-command which allows to automate Runaway itself, with a program of your own writing. We won’t go into the details of writing such a program in the tutorial, but we will use one provided with the experiment, so as to present the sched feature.
The basic idea is that Runaway will spawn a scheduler process, and will communicate with it to obtain the arguments to be given to the next execution. In our case, the scheduler is contained in the scheduler.py file. It reads arguments from an xlsx file that must contains the arguments and outputs columns. In our case, at the moment, the file looks like the following able:
| –dry-run | –epoch | –lr | –no-augment | uuid | parameters | stdout | stderr | ecode | path | features |
|---|---|---|---|---|---|---|---|---|---|---|
| True | 1 | 0.1 | True | |||||||
| True | 2 | 0.01 | False | |||||||
| True | 1 | 0.1 | False |
The idea is that as Runaway gets executed, the rest of the columns will be filled with output data. Moreover, this scheduler supports a --reschedule option to automatically re-execute arguments that returned a non-zero exit code. To run it, try the following command:
$> runaway sched localhost train.py "./sched.py --file=experiments.xlsx --reschedule"
  runaway: Loading host
  runaway: Reading arguments
  runaway: Reading ignore files
  runaway: Compress files
  runaway: Transferring data
  runaway: Querying the scheduler
  runaway: Querying the scheduler
  runaway: Starting execution with arguments"--dry-run --epoch=1 --lr=0.1 --no-augment "
  runaway: Querying the scheduler
  runaway: Starting execution with arguments"--dry-run --epoch=2 --lr=0.01 "
  runaway: Starting execution with arguments"--dry-run --epoch=1 --lr=0.1 "
  runaway: Querying the scheduler

  31908337-10bc-485a-806c-e3ef38cf6d1e: pid 189707's current affinity list: 0-7
  31908337-10bc-485a-806c-e3ef38cf6d1e: pid 189707's new affinity list: 1
  ...

  runaway: Unexpected message:
           Unexpected message received ErrorResponse { message: "All executions were processed." }
  runaway: Cleaning data on remote
  runaway: Runaway experienced an error: failed to request parameters
On the execution trace, we can see that the scheduler program is being queried by Runaway, which in turns execute the provided arguments. Don’t be disappointed if this command return a non-zero status code, it is the expected way when the scheduler gets out of arguments.
While the executions were running, the experiments.xlsx file has been updated by the scheduler. Indeed, you should now have a table resembling the following:
| –dry-run | –epoch | –lr | –no-augment | uuid | parameters | stdout | stderr | ecode | path | features |
|---|---|---|---|---|---|---|---|---|---|---|
| True | 1 | 0.1 | True | 306ab… | –dry-run –epoch=1 –lr=0.1 –no-augment | pid 1870… | ./train.py … | 0 | … | |
| True | 2 | 0.01 | False | 3190x… | –dry-run –epoch=2 –lr=0.01 | pid 1870… | ./train.py … | 0 | … | |
| True | 1 | 0.1 | False | 8080t… | –dry-run –epoch=1 –lr=0.1 | pid 1870… | ./train.py … | 0 | … |
You can also see that if an execution fails, it is rescheduled automatically by the scheduler.
By modifying this scheduler, or creating your own, you can use runaway to adapt a lot of use cases:
- Automatic analysis
- Online parameter selection
- Automatic backup …
Okay, that’s it for the basic use of Runaway. For more advanced use, read the other pages of the documentation!